
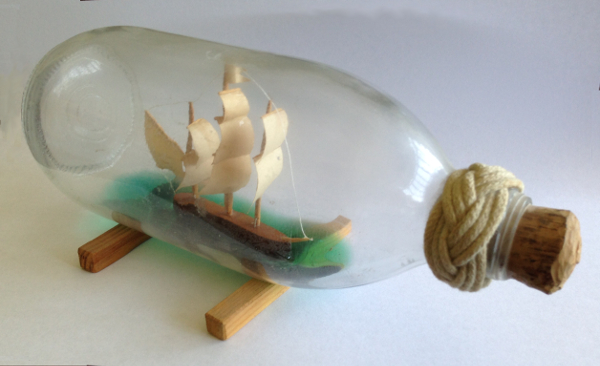
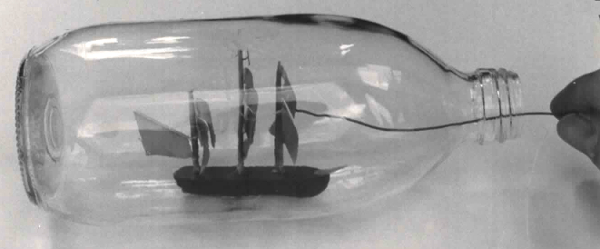
How did you get that big boat in that little bottle?
No, I didn't cut the bottle in half and put the boat in and glue it back together. It wasn't that difficult.
And no, I didn't use miniature tools and work around inside the bottle constructing the ship. I could show off by saying I had, but much as I hate to admit it, it was a lot easier than that.
Putting a simple boat in a bottle is really quite easy, but for people who first see it, it appears to be very difficult; and that's the fun of it.
Picking a bottle is the first step. A strange bottle might be okay for a real pro, but for a first attempt, stick with the basics.
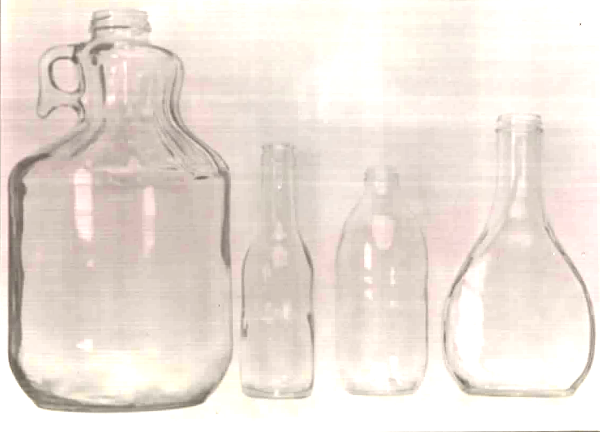
For my boat in bottle, I picked bottle three. Bottle one is too big, number two has too long a neck, and number four is shaped oddly.
The bottle I chose is a 12 oz. vinegar bottle. (Note: I did this looong ago, which is why the pictures are in black and white, and you may not be able to find exactly this type of bottle, but try to find something of the same shape.)
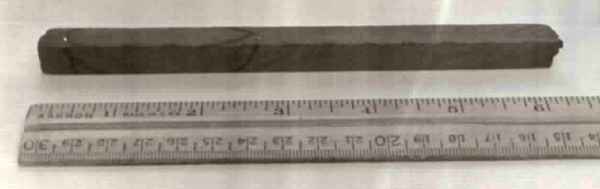
Next, choose the wood for the hull of your ship. The piece here is a section of garden stake about a half-inch square. Choose a piece of wood that you can easily carve to fit through the mouth of your bottle and a type of wood that is neither too hard or too soft. Pine is just great.
As you can see from the ruler, it is about six inches long and I've marked on the wood the bow and stern of the ship as well as the deck area.

Now you can see what the lines were for, as guides for carving. (Use a sharp, modeling knife if available, and be sure to carve away from yourself. Note that the long piece of wood attached to the boat makes it easy to hold while carving.
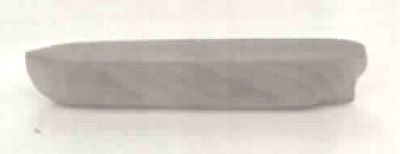
When you are done carving, sand it and then cut it off from the stick, sanding the cut-off point as well.

Now cut the masts. Here I've used a bamboo meat skewer cut in sections, but large wooden matchsticks work well, too. Notice that one mast is the length of the boat, another is somewhat shorter and the third is about two-thirds the length of the boat. If you are using match sticks, carve them so they are rounded.
Next, you have to taper the masts.
What I do it take a piece of fine sandpaper, fold it over, stick the mast between the layers and with my other hand twist it and slide it in and out. Pretty soon it will be in the shape you want it.
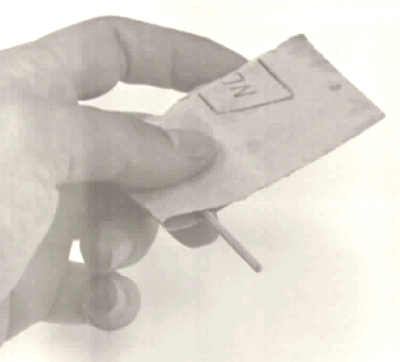
Next you need to drill little holes through the bases of the masts (You will see why in a moment).
To do this I make a little bitty drill. I do this by clipping a straight pin in half with a cutting pliers, then if the metal splays out, I crimp it back to the width of the pin. This forms a very rough end on the pin.
I then grab the pin with a pliers, as shown, while holding the mast in my other hand, and twist the pliers so the pin rotates first one direction, and then the other.
It takes a bit of patience, but eventually the rough end of the pin begins to wear a hole in the mast, and once you're started, it's easy going. Just drill all the way through.
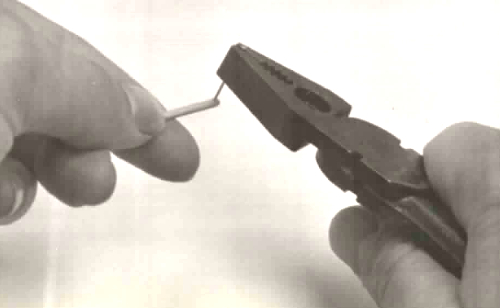
After drilling the masts, get three more pins and cut them off about a quarter inch from the tip.
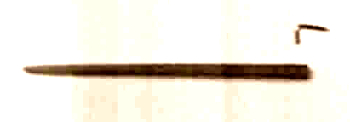
Then bend each pin so the longer part has the point, and the short end is just a little longer than the width of the mast at its base.
Now stick the blunt ends of the three pins through the masts and push the sharp ends into the ship at appropriate intervals. Stick the pins just far enough in so the bottom of the masts will touch the deck when the masts are upright. If the wood is hard, you might want to start the holes with another pin, tapping it in gently with a hammer.
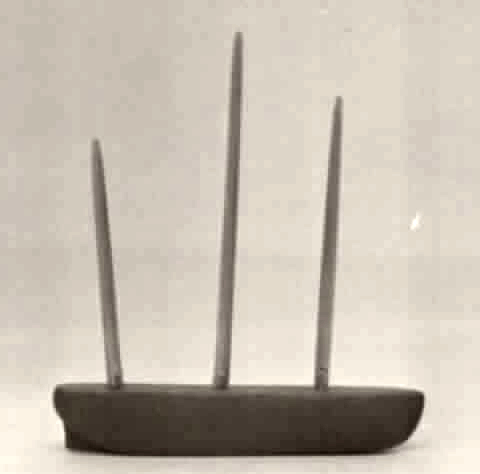
The idea is that the masts should hinge on the pins. If the pins are a bit wiggly, secure them with a bit of white glue, but don't glue the masts! Make sure they can continue to move on their hinges.
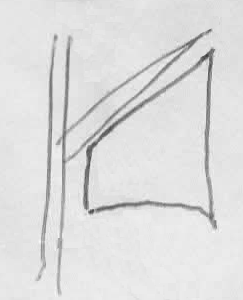
Then lay the masts down and stick the ship and masts into the bottle, as shown. Check as it goes through the neck to make sure there is plenty of room on the top and sides of the masts. If there isn't, you will have to shave down the bottom of the boat and curve it so it fits itself better through the neck. Once it is inside, use a pencil to raise the tallest mast to make sure it will go straight up inside the bottle. If it does not, shorten the mast until it does, and trim down the other masts so they look correct beside it.
Remove the boat and carefully pull off the masts. Then make sail spars by cutting toothpicks and sanding them smooth. (Hint: Make the top spars short, then make them longer for lower on the masts.) Make two spars for the front mast, three for the second, and two for the third.
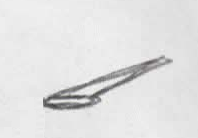
Make a bowsprit (the spar that points forward off the front of the ship) and glue it in place. Also for the third mast, make a boom spar to stand out to the rear of the boat. The boom should stand out at about 45 degrees and is tapered on only one end.
Glue the spars (except for the boom!) on the masts, putting the first one on each mast just below the top. On the first and third, place the second mast about half way down. On the middle mast, put the third spar about half way down and the second spar between the first and third.
To attach the boom on the rear mast, tie a bit of thread to the bottom end of the boom, and then tie the thread to the mast just below the bottom spar and glue the thread where it ties to the mast and to the boom. The bottom of the boom should be touching the mast. The idea is that the boom should be able to flex but its base should stay right against the mast.
Next, attach the masts with spars back on the ship. You might use a little glue on the points of the pins if you are afraid they might fall out. Make sure you don't glue the masts, though.
Once they dry, fold the masts over and try to slip the boat backwards into the bottle without the spars jamming at the neck. You may have to lay one mast down forward and the other two down to the rear of the ship to get it in. If it will not fit, trim the spars with a knife or shave down the bottom of the hull so it will fit.
Now, remove your boat and paint it whatever nautical colors you like, but make sure the masts can still pivot.
Now make the sails. A sheet of white paper will do just fine. Cut the paper in sail-y shapes, making sure to match the top edge of the sail with the length of the corresponding spar.
The boom sail is shaped a bit differently, as you can see here.
When you have cut them out, you may wish to give them a weathered look. Just dip them in a cup of coffee for a few minutes and let them dry.
When they are dry, roll them over a pencil to give a curve to the sails as if wind was catching the ship from behind.
Then carefully glue the top edge of the sails to the appropriate location on the spars.
If you like, you can cut a little flag out of paper, color it as you like, and glue it on the top of the middle mast, but if you do, make sure the flag is blowing toward the front of the ship.
Next, with the masts vertical, glue a piece of thread from the stern up to the lower corner of the rear sail (the boom sail), then glue another thread starting at the tip of the boom, then when it dries glue the same thread to the top of the rear mast. If you were able to insert the ship with all three masts laying toward the rear, then glue the thread to the top of the middle mast, and finally to the top of the front mast. If you could not insert the ship with all three masts laying down to the rear (and you probably could not), then only glue the thread to those masts that were pointed to the rear. Don't snip off the thread after the final gluing-point, but keep a long piece of thread attached so you can pull the masts up after you insert the boat into the bottle.
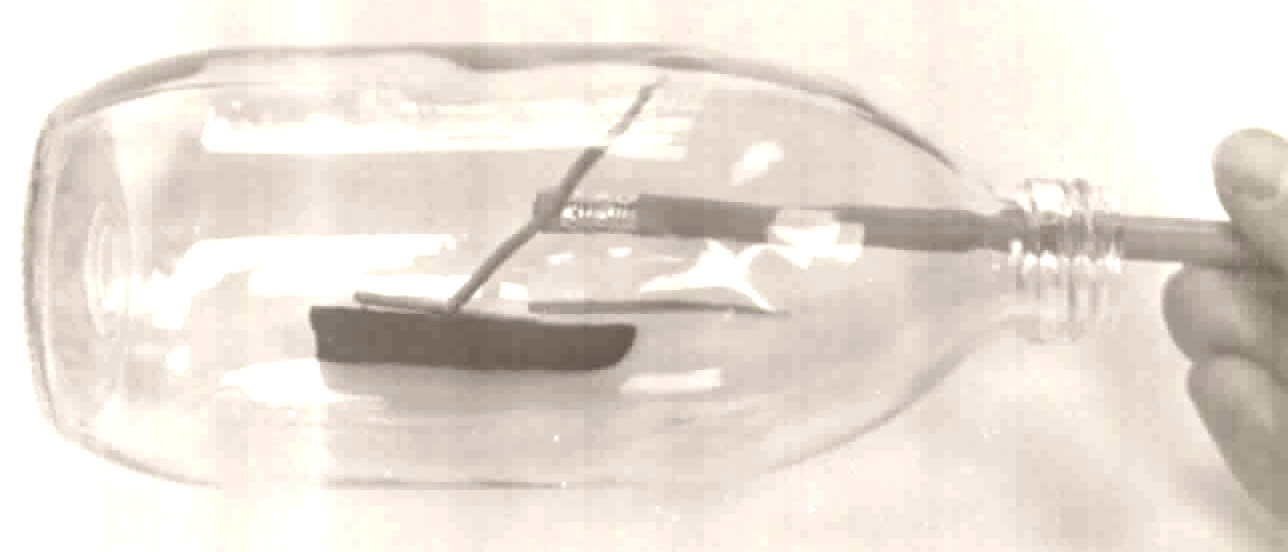
Next, slip the boat in the bottle stern (rear end) first, the same way you did when you checked. Be careful! Don't let the spars break or the masts come off their hinges.
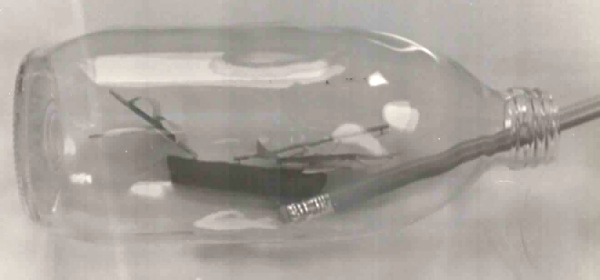
Once in the bottle, carefully slide the boat to the side of the seam that often goes up the sides of the bottle, and with a pencil eraser, spread a little white glue on the inside of the bottle right at the seam (if there is one), then wipe off the pencil and use it to carefully slide the bottom of the boat onto the glue and adjust it in place.
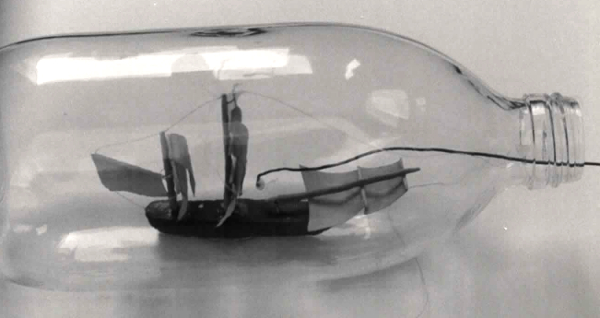
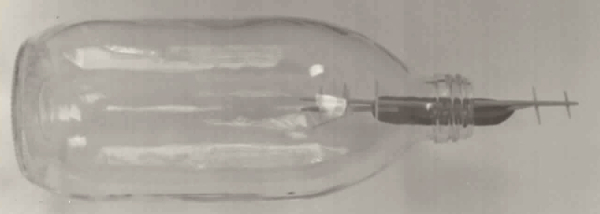
Let the glue dry then carefully use a piece of thin wire to put a spot of white glue at the base of each of the masts and then pull the thread so the masts (or, rather, those masts to which you attached the thread) lift straight up. Secure the thread with a piece of tape on the outside of the bottle to keep the mast(s) from shifting as they dry.
If you had to lay the front mast(s) down toward the front of the boat when you inserted it into the bottle, then push it/them up with a piece of wire and glue it/them at the bottom of the mast(s). Be careful that they stay vertical since they don't have a thread to support them. When the masts have all dried, use a thin wire to glue the thread to the top of the remaining masts.
When the masts and the thread on the masts have dried, glue the thread to the bowsprit on the front of the boat and let it dry. Then, to get rid of the excess thread, heat a steel wire on a stove burner until it is red hot and VERY carefully touch the thread just in front of the bowsprit. It should burn right through and you should have rigging that goes from the stern of the boat over the masts and attaches at the front tip of the bowsprit.
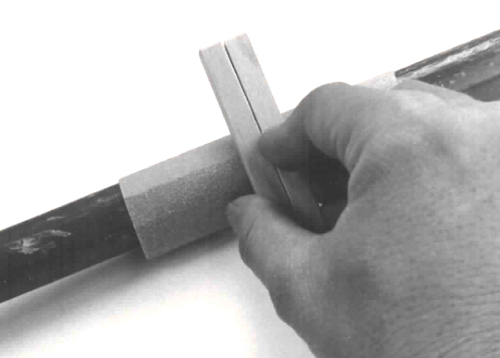
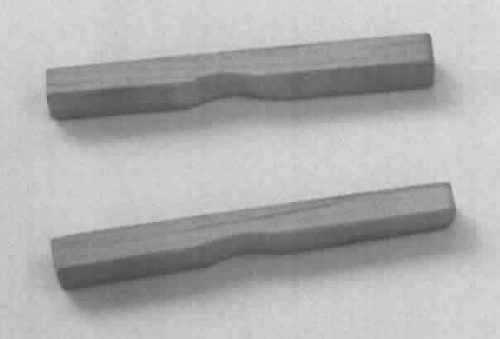
Next, put a stand on the boat. I glued two little square sticks on the bottom of the bottle after putting a curve in them by wrapping sandpaper around a broom handle and rubbing the sticks in the middle.
Now for the ocean. Buy a can of casting resin, catalyst, and sea-colored tint (blue, blue-green) at an arts and crafts or hardware type store.
Read the directions on how to use it, experiment a couple times, and then very carefully mix the resin with tint and catalyst and pour it in the boat bottle, with the bottle on its side and the boat on the bottom, of course.
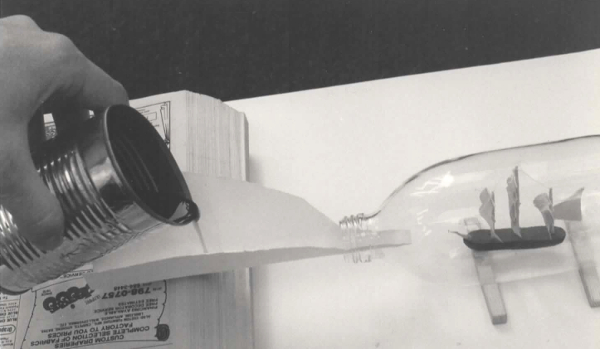
You may want to brace the bottle with a bit of clay (though I'm not doing it here, and you should pour the resin VERY slowly through a thin, cardboard trough (you can make one from a manila folder). The trough should stick out the front of the bottle (you may want to fix the trough in place to keep it steady - again, a bit of clay may work well). It just takes a tiny bit of pouring, so watch out!
It will take a few days to completely dry, then when it does, carve a plug from a tree branch or use a cork, or whatever, and glue it in the neck of the bottle with white glue.
As a final touch I like to wrap a Turk's head knot around the neck of the bottle to hide the threads and give it a more attractive appearance. I'm not going to describe how to make a Turk's head knot, but you can easily find a description on the Internet.
When you're done, you should have a ship in a bottle that looks much like the one at the top of this page. Congratulations!
“God often bestows temporal prosperities on the wicked, to show how lightly he esteems what the world is so dazzled with; but crosses he reserves for his own, whom he would humble under his Almighty hand, and make them the objects of his delight.”
–Fenelon